[1] 플러그인
유니티 플러그인에는 두가지 종류가 있습니다.
이 중, 네이티브 플러그인을 살펴보겠습니다.
[2] 네이티브 플러그인
1. 네이티브 플러그인은 platform-specific native code libraries 입니다.
2. 네이티브 플러그인은 C 기반 언어 (C, C++, and Objective-C) 로 작성가능합니다.
3. 네이티브 플러그인은 simple C interface를 제공합니다.
4. 네이티브 플러그인은 타겟 플랫폼에서 네이티브 코드 컴파일러로 빌드됩니다.
유니티에서는..
native 플러그인이 제공하는 인터페이스를 다른 C# 스크립트들에게 공개하는
브릿징 C# 스크립트를 만들어줍니다.
그럼 다른 스크립트에서 브릿징 C# 스크립트를 통해 네이티브 플러그인 안에 있는 functions 를 호출할 수 있게 됩니다.
(브릿징은 문서에 나오는 용어는 아니고 제가 붙였습니다 ㅎ_ㅎ)
[3] 네이티브 플러그인 예제 (1)
문서에 있는 예제인데요,
네이티브 플러그인에 이렇게 간단한 single function 만 있다고 해보면
float ExamplePluginFunction () { return 5.0F; }
저 코드를 Unity에서 접근하기 위하여 아래처럼 해주면 됩니다.
using UnityEngine;
using System.Runtime.InteropServices;

class ExampleScript : MonoBehaviour {
    #if UNITY_IPHONE
    // On iOS plugins are statically linked into
    // the executable, so we have to use __Internal as the
    // library name.
    [DllImport ("__Internal")]
    #else
    // Other platforms load plugins dynamically, so pass the
    // name of the plugin's dynamic library.
    [DllImport ("PluginName")]
    #endif
    private static extern float ExamplePluginFunction ();

    void Awake () {
        // Calls the ExamplePluginFunction inside the plugin
        // And prints 5 to the console
        print (ExamplePluginFunction ());
       }
    }
[4] 네이티브 플러그인 예제 (2)
제가 사용 중인 NativeGallery 플러그인을 살펴보겠습니다.
NativeGallery.mm 파일에 헤더 + 구현 내용이 있고
이를 호출하는 NativeGallery.cs 파일 (브릿징 스크립트) 가 있는 것을 볼 수 있습니다.
[5] 네이티브 플러그인 예제 (3)
objective c 코딩하기 싫지만..
그래도 한번 만들어보겠습니다~!~
iOS 네이티브 얼럿을 띄울 수 있는 네이티브 플러그인을 만들어볼게요
# Xcode
Xcode에서 아래 두 파일을 만들어줬습니다.
1. Alert.h 파일
#import <Foundation/Foundation.h>

@interface AlertManager: NSObject
-(void)showAlert;
@end
2. Alert.m 파일
#import "Alert.h"
#import <UIKit/UIKit.h>

@implementation AlertManager
-(void)showAlert
{
    UIAlertController *alertVC = [UIAlertController
                                              alertControllerWithTitle:@"Title" message:@"Message"
                                              preferredStyle:UIAlertControllerStyleAlert];
    [alertVC addAction:[UIAlertAction
                            actionWithTitle:@"OK"
                            style:UIAlertActionStyleDefault
                            handler:^(UIAlertAction* action) {
                                [alertVC dismissViewControllerAnimated:YES completion:nil];
                            }
        ]];
    UIViewController * viewController = [[[[UIApplication sharedApplication] delegate] window] rootViewController];

    [viewController presentViewController:alertVC animated:YES completion:nil];
}
@end
# Unity
1. Alert.mm 파일을 만든 후, Xcode에서 만든 파일 두개의 코드를 복붙해줍니다.
(Unity 쪽에서는 Objective-C++(.mm) 이 필요한 것 같아요!
제가 처음에 Objectiv-C (.m) 파일을 그대로 가져왔는데 iOS 빌드하니까 함수를 못찾더라구요,, ㅠㅠ
제가 사용 중인 다른 플러그인들도 다 mm 파일이 들어있었습니다!)
#import <Foundation/Foundation.h>
#import <UIKit/UIKit.h>

@interface AlertManager:NSObject
+(void)showAlert;

@end

@implementation AlertManager
+(void)showAlert
{
    UIAlertController *alertVC = [UIAlertController
                                              alertControllerWithTitle:@"Title" message:@"Message"
                                              preferredStyle:UIAlertControllerStyleAlert];
    [alertVC addAction:[UIAlertAction
                            actionWithTitle:@"OK"
                            style:UIAlertActionStyleDefault
                            handler:^(UIAlertAction* action) {
                                [alertVC dismissViewControllerAnimated:YES completion:nil];
                            }
        ]];
    UIViewController * viewController = [[[[UIApplication sharedApplication] delegate] window] rootViewController];

    [viewController presentViewController:alertVC animated:YES completion:nil];
}
@end
2. Alert.mm 파일에 extern "C" 코드를 추가해줍니다.
iOS용 플러그인 빌드 문서를 보면 아래처럼 나와있기 때문입니다.

https://docs.unity3d.com/kr/2020.3/Manual/PluginsForIOS.html
네이밍 방식은 NativeGallery 플러그인 보고 따라했줬습니다!
extern "C" void _AlertManager_showAlert( )
{
	return [AlertManager showAlert];
}
3. Alert.cs 라는 C# 스크립트 파일을 만들고 아래와 같이 작성해줍니다.
using System.Runtime.InteropServices;
using UnityEngine;

public class NativeAlertManager : MonoBehaviour
{
    [DllImport ("__Internal")]
    private static extern void _AlertManager_showAlert();

    public static void ShowAlert()
    {
        #if UNITY_IOS
        _AlertManager_showAlert();
        #endif
    }
}
4. 이제 다른 스크립트에서 NativeAlertManager 를 통해 네이티브 플러그인 안의 함수를 호출할 수 있게 됩니다.
void OnClick()
{
    NativeAlertManager.ShowAlert();
}
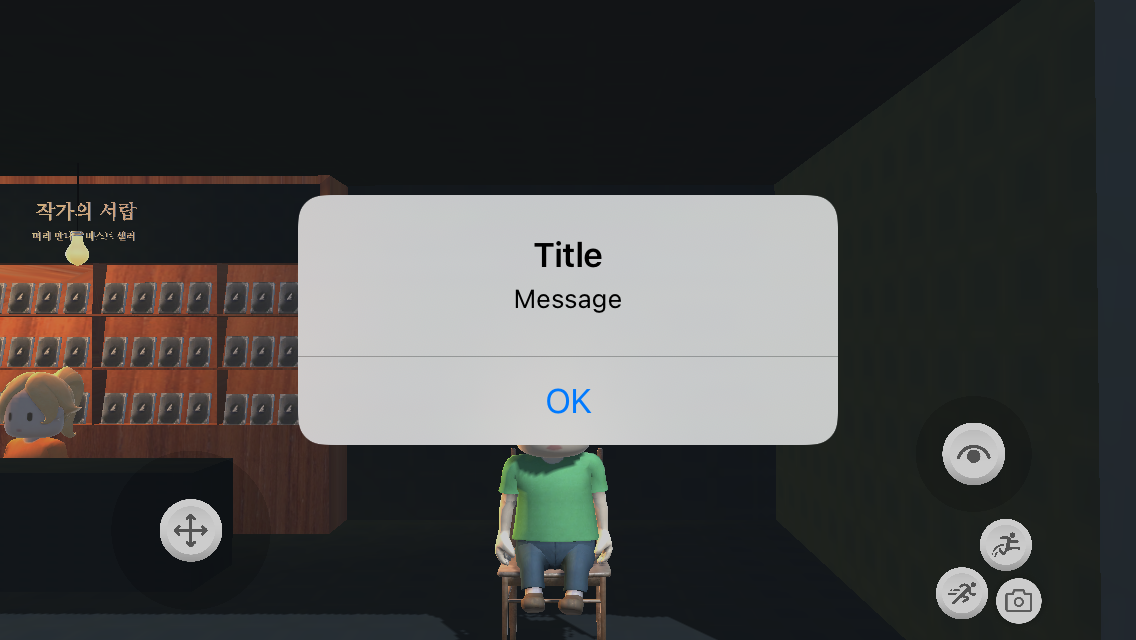
빌드해보면 잘 나옵니다~!

TODO
사실 안드로이드까지 해야지 네이티브 플러그인 공부가 마무리 되는데,,,, @_@
AssetStore 에 iOS, 안드로이드 각각만 지원하는 패키지들이 많은데
그 이유를 알겠습미다,,,
'Unity' 카테고리의 다른 글
| [Unity][팁]구글 스프레드시트로 데이터 쉽게 관리하기(UGS) (0) | 2022.09.14 |
|---|---|
| [Unity][팁] 기술 팁 (0) | 2022.09.14 |
| [Unity][개념,방법] 오브젝트 풀링(ObjectPool) 이란? (0) | 2022.08.25 |
| [Unity][개념] 유니티 단위 unity (0) | 2022.08.23 |
| [Unity][개념] GameObject, gameObject 차이 (0) | 2022.08.23 |